
Rolled threads (left) vs. Cut threads (right)
|
Cruising Info Equipment Pages |
Turnbuckles
Most folks think that marine turnbuckles are pretty much the same, but that's not true at all. In this article we talk about the following subjects as they relate to turnbuckles:
| Cut or Rolled threads? | Galling |
| Telling the difference | Installing |
| Relative strengths | Beware large slugs |
| Cyclic loading | Open or closed frame? |
| What we do on Ocelot | |
Cut or Rolled Threads?
Our main reason for publishing this page is to explain this difference, which few people seem to know
about but is very important to those of us who like our masts remaining upright. The threads on
the shafts of turnbuckles are usually made one of two ways:
| Cut threads | are cut into the shaft by running a "die" over the shaft. A die is like a big nut made of especially hardened steel with very sharp teeth. This is the normal way of putting a thread on a shaft, and Ocelot carries several small dies on board. In the process of cutting the threads into a shaft of stainless steel, the bottoms of the threads (cut by the points of the die) are very sharp. These create stress concentrations. Stresses go up as the inverse of the radius, so the sharper the cut, the smaller the radius at the bottom of the threads, and the higher the stresses. More importantly, the process of cutting threads can create micro‑cracks in the bottoms of the threads. These micro‑cracks have only a tiny radius at their tips, so stresses really concentrate there, which can result in the cracks propagating across the shaft, especially under cyclic loading situations. |
| Rolled threads | are made by the shank being rolled through a set of hydraulic threading dies, which push into and displace the steel to form the threads. No material is lost (although the original shank is slightly smaller to begin with). This requires large and powerful equipment. Since the teeth on these dies don't have to cut, they don't need to be very sharp, just hard. Therefore, the bottoms (and tops) of the threads are slightly rounder, which reduces stress concentrations and all but eliminates micro‑crack formation. In fact, this cold forging appears to toughen the steel somewhat. |
 Rolled threads (left) vs. Cut threads (right) |
Wikipedia has more detailed descriptions, with good drawings of different ways to roll threads (but no thread cutting dies, which are much more common).
How to tell the difference between cut and rolled threads:
This is actually quite easy if some of the shank, the original shaft, without a thread, is still
visible.
With a cut thread, the threads are the same width as the shank (the original shaft before the thread was put on). The threads are made by removing the steel of the shank.
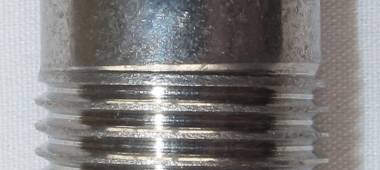 These rolled threads stand wider than the shank |
But with rolled threads, no material is lost. When the threads are rolled (mashed) into the shaft, some of the steel is pushed in (to create the thread) but this means that some of the steel has to flow up to form the tops of the threads. Therefore, the finished threads are slightly taller than the original shaft. With larger turnbuckles, you can actually see this, but even with smaller sizes you can feel it by running your fingers from the shank to the threads and back again. The threads will be noticeably taller than the shank.
Relative strengths of cut and rolled threads:
Like a chain, the strength of a threaded rod is determined by the minimum diameter - in this case,
the valleys of the threads. Since this is the same for both cut and rolled threads, there
should be no difference in the tensile strengths of either one. However,
this study shows
that rolled threads actually have a slightly higher tensile strength. The slightly smaller shank used
to make a rolled thread would have a lower shear strength, but turnbuckles should see no shear
(side) loads at all, especially if a toggle is used to insure that leads are fair and all loads are
in tension (in line).
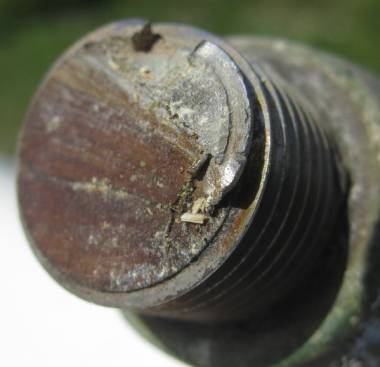 This old (brown) crack propagated from bottom to top |
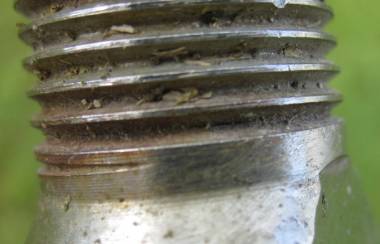 But the (Gibb) stud was obviously a cut thread |
Cyclic loading:
Cracks don't usually propagate in steel, or propagate only slowly, if the loads are static.
But sailing loads are very cyclic and changing constantly as wind and sea conditions change.
Pounding into a seaway produces especially strong cyclic loads. These cyclic loads are what
can cause cracks to propagate - across a turnbuckle shaft or even across a chainplate or a swage.
This is why it's very important to check the rigging before passages - and why it's important to use
turnbuckles with no micro‑cracks.
Open or Closed frame turnbuckles:
Marine turnbuckles usually come with either an open body or a closed body, the latter often being
called bottle‑screws. The jury is still out on preference - we've used both and each type has
benefits and weaknesses. Once you get a turnbuckle tensioned up the way you want it, it needs to
be held in that position or the cyclic loads will tend to make it unwind. Bottle‑screws do
this with a lock‑nut on each threaded section that is jammed up against the body to prevent
rotation. Open body turnbuckles usually have holes in the ends of the threaded parts for
split‑pins, which prevent rotation. Split‑pins are sharp so open turnbuckles need to be
prevented from cutting sails and snagging ropes, usually by wrapping them in tape. Bottle‑screws don't need to be
taped but the insides can't be inspected, and water can get inside and sit there, causing corrosion.
As far as we can tell, this can be a personal decision, as both seem to work well.
Why aren't turnbuckles made of pure stainless steel?
Most marine turnbuckles have stainless steel threads (and the Ts, toggles, forks, eyes, swages, etc
that attach to the threaded part) but virtually all of the bodies of turnbuckles are made from
bronze, often with a chrome plating to prevent oxidation and to look pretty. The reason the
bodies aren't stainless steel is that stainless steel galls too easily. If
2 pieces of stainless are pressed together very hard, they can fuse together in a way that prevents
them from moving easily. Attempts to do so can result in the stainless steel actually
shredding from one side when the other side tries to move. Wikipedia provides a more detailed
explanation of galling. But the upshot
is that bronze bodies are used on most marine turnbuckles to prevent galling of the stainless steel
threads.
Installing turnbuckles:
Most folks think that turnbuckles should have their threaded parts started by the same number of
turns. This gives the biggest range of adjustment, but there are good reasons why the bottom
side should be threaded in a few turns more than the top side. If, for some reason, the
turnbuckle unwinds unexpectedly, you don't want the whole thing coming apart at the same time, as
this often leads to the body falling overboard. If one part is going to release, let it be the
upper (wire) part, and let the barrel remain connected to the deck or base of the mast.
Unexpected release sounds unusual, but it happened to us in 2002 (with our cap‑shroud, 20 miles
offshore and beating into 26 knots of wind - caused by a forgotten split‑pin). Even while
installing and testing a turnbuckle, you don't want it all coming apart at the same time. Experienced
riggers usually wind the bottom thread in about 5 turns before starting the upper thread.
Beware of large slugs:
Many marine turnbuckles have a strap‑toggle on the opposite end from the wire. This is usually
a strap of stainless steel that goes over a T that is forged onto the end of the threaded part of
the turnbuckle. Strap‑toggles provide an additional degree of freedom, so the turnbuckle can
align precisely with the load.
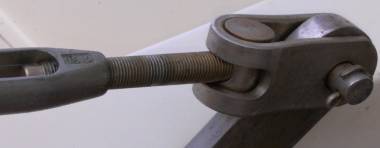 Stud threaded into a large slug - corrosion?? |
However, some turnbuckles don't forge a T onto the end of the threaded part for the strap‑toggle to go over. Instead, the thread continues to the end of the shaft and is threaded into a large slug, with the strap‑toggle going around this large slug. The slug is usually welded to the shaft on the side opposite the turnbuckle body. The problem with this type of toggle is that saltwater sits down in the threads of the slug and you can't inspect the threads that are inside the slug. Corrosion can then fester, unmonitored.
We had a turnbuckle of this type fail on our headstay in the early 80s. Luckily, that boat had a baby‑stay, which kept the mast up, but we were very lucky not to lose the whole rig. Post‑mortem investigation showed that the turnbuckle failed about 1½ turns down inside the slug! There was no corrosion showing on the outside, and no way to know that the turnbuckle was about to fail. Therefore, we now try to stay away from large‑threaded‑slug type strap‑toggles.
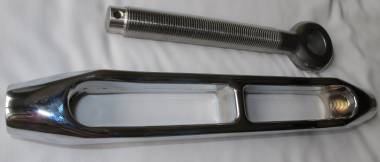 Yellow threads - Open Gibb turnbuckle of plated bronze |
What we do on Ocelot:
Obviously, all of our turnbuckles have rolled threads. In 2013 we ordered several new turnbuckles
for our headstay and our 8 diamond stays on the mast. We found that we had to explain the difference between cut
and rolled threads to most of the marine suppliers we talked to, as most didn't appreciate the
difference. Vela Sailing Supply
supplied us a Gibb turnbuckle for our headstay, and owner
Rod Favela was very patient and responsive to
our needs. We've used Gibb turnbuckles for years with no problems, but one of Ocelot's sister
ships in Bermuda lost their rig when their (cut‑thread) Gibb turnbuckle on their cap‑shroud failed,
apparently from micro‑crack propagation (see photos above). So Gibb apparently sells both cut‑thread and
rolled‑thread turnbuckles. Check what you buy carefully.
John Franta at Colligo Marine initially ordered us 8 Alexander Roberts turnbuckles for our diamond stays, specifying rolled threads. But when the drop‑shipment arrived they obviously had cut threads! It turns out that Alexander Roberts, who supply turnbuckles for West Marine, don't make rolled thread turnbuckles (and had ignored John's requirement)! This caused a huge fiasco as the replacement Hayn turnbuckles couldn't arrive before we flew back to SE Asia, so they had to be shipped to Langkawi, Malaysia (which John arranged for us). We can recommend all companies linked to in this "what we do on Ocelot" section.
Equipment Pages:
Cruising Info:
Top Level: Home | Destinations | Cruising Info | Underwater | Boat Guests | Ocelot | Sue | Jon | Amanda | Chris | Site Map | Make a Comment
|
If our information is useful, you can help by making a donation |
Copyright © 2000‑ Contact: Jon and Sue Hacking -- HackingFamily.com, svOcelot.com. All rights reserved.