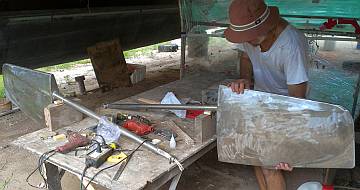
Jon's setup for working on the rudders, under a nearby cat
94 More Varnishing
Summary: The guys continued their varnishing, making excellent progress, but several other projects moved forward as well. This week:
|
 Jon's setup for working on the rudders, under a nearby cat |
Monday, August 19:
A beautiful, hot sunny start to the week, with a long‑awaited project started.
Jon really tucked into the rudder project today. He reinforced an old work table last week, and this morning got blocks of wood screwed into place to hold the rudders in the correct orientation, with hose‑clamps to hold the rudder‑shafts securely at each end. First job of the day, once they were in place, was a quick sanding with 60 grit paper and the small orbital sander to scratch and clean the surface.
Jon asked a local (and well respected) boat builder and designer, Neil, to came by to consult on the shape of the rudders. So late in the day, Jon and Neil took measurements of the boat and the stainless steel rudders as they are now. Lots of drafting and notes. We look forward to hearing his suggestions soon! Then Jon will have a better idea of what shape to create with the epoxy and filler under fiberglass.
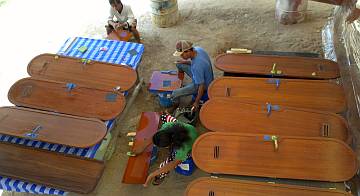 Yando, Heru, & Chambron sanding under Ocelot's stern |
We did learn one thing up front. Our waterline beam (of one hull at the widest) is just under 5 feet (1.5m) and the new waterline length is about 47.5' (14.5m) so the length/beam ratio at the waterline is 9.5:1. This, according to Neil, is a ratio defining a heavy load catamaran. That's us. Cruising cat all the way. He has built cats with a ratio of 16:1 on which he says you dare not bring a sandwich!
Baw was, unfortunately, out sick all day. We certainly hope he's doing better and is back with us tomorrow. The men set about their sanding and varnish preparation work without direction needed. The Indonesians worked all day in the shade behind Ocelot, sanding last week's 4th gloss varnish from the interior doors. Then they, and Pla, joined Sue at the store room to retrieve the last 7‑8 interior doors and the steps to the bunks which are being varnished the same as the doors and bulkheads. (The floors themselves get a different treatment, and we haven't started them.)
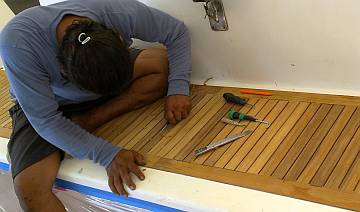 Houa used interesting tools for cleaning out the grooves |
Pla and Lek worked inside the plastic tent under Ocelot, and it must have been hot, but they seemed to not mind. At least there was a light breeze blowing through. They, too were doing more sanding on the doors. Lek got a 2nd gloss layer on one of the doors that had had to be stripped back to bare wood due to staining, so it was behind the system. The varnish didn't look very smooth as it went on, but there was nothing to do about it. Lek's English is very basic, and we didn't have Baw there to either interpret or to discuss the quality of work with Lek. It will have to wait until tomorrow.
Sue set up the tall fan on the side of the cockpit so that she could work in comfort in the 95+°F (35+°C) temperatures up there. She donned a household rubber glove and used green scrubby pads and lots of acetone to get a start on cleaning the areas between nonskid panels. These "gutters" and bigger areas without nonskid are awaiting their turn to be sprayed with gelcoat, and she is getting a jump‑start on the cleaning process. Unbelievable how dirty it's gotten just being in the air for 6 months. Some of the gutters still have our Ocelot White gelcoat on them from the first spray in February, and other areas are down to either old gelcoat or polyester filler (used to re‑shape the deck), and these filler areas are very porous and difficult to clean. If we can't get them white‑white, we may remove some and have Baw fill them in again with fresh (less porous) filler. We really, really want the next gelcoat spray to stick! Forever!
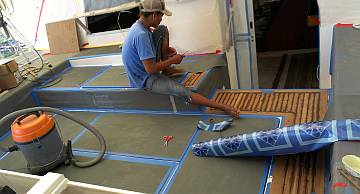 Heru covering the cockpit in vinyl to protect it |
Houa began the day with a last quick sanding of the aft‑deck planks. Then he moved on to the day's main project which was to create smooth, deep, clean (as in wood‑shaving clean) grooves between the teak plank sides and ends, ready for the Sika calking. This involved using a variety of strange groove‑cleaning tools. A hook with a tiny chisel on the end, a wide chisel and hammer, and other strange shaped tools. By day's end he was all finished, so tomorrow morning he'll go through the 3‑part process of calking the planks.
Now that the cockpit teak is finished (all but the final sanding), Houa asked Heru to cover all the teak with vinyl to protect it for the coming weeks, until just before we launch! Bye‑bye teak. Hello black vinyl. It will be really fun to unveil it again, sometime in the future!
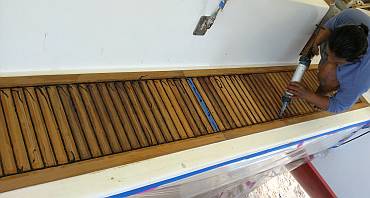 Houa calking the aft-deck with Sikaflex - last of the teak deck! |
Tuesday, August 20:
A busy day, and the Drinks Lady with her cart was very welcome in the afternoon 95°F (35°C) heat!
The big news is that the teak cockpit project is finished! Well, there is some final sanding to be done, but it will wait until the last minute. Houa jumped right in this morning cleaning the aft‑deck teak with acetone, waiting, then applying the Sika Primer. Out came the Sika gun and by 10:15 Houa had the aft deck fully caulked! Woot!
Houa, Baw and Sue had a big discussion about which salon areas to repair, now that Houa is free for another project. The teak veneer on the bulkhead under the nav table is water‑stained and dark. After really looking at the area, Houa declared that it was not a big job, but a difficult one as it involved removing parts of 3 different locker fronts if he were to repair the actual bulkhead. We decided that Baw would sand all of the darkened wood back to bare teak and see how it looks. If the underlying frame is undamaged, we'll epoxy coat the wood for water protection, since rain water comes in sometimes, and then build up the varnish.
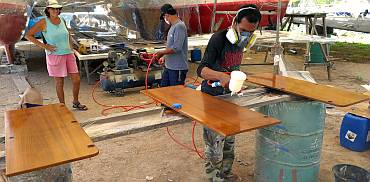 Spraying the first coat of satin varnish on some cabinet doors |
The most important area in the salon for wood repair is the water‑damaged veneer on the flat shelf near the portside portlight. This is an area that can get rain and once some salt water came in there when the wake from a ship caught us unawares. As a result the veneer buckled and broke for about a foot aft of the portlight. Houa will replace the veneer with 4 small solid teak planks, glued side‑by‑side, then build a small attractive frame around them to make the area "look beautiful." To that end, he glued up a template of the damaged area, chose thin, rough teak planks, and planed them smooth to 4mm thickness.
Baw (with Pla as his sidekick) worked on preparing the many teak locker doors for their first satin varnish spray. Not wanting to spray under Ocelot (thank goodness!) he set up a work station in front of Ocelot with all the appropriate masking plastic. Since we're still not 100% sure we want just a satin finish (as opposed to half‑gloss‑half‑satin) we asked him to start by spraying the insides of the locker doors, so we still have some options on the outsides of the doors.
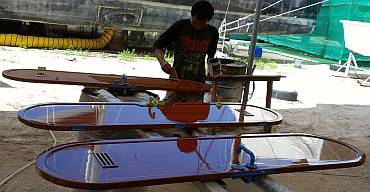 First coat of gloss varnish goes on the big "people" doors |
The satin spraying was finished by lunchtime, and the pieces were allowed to sit in situ for a couple hours. Then Baw and the men carried each of the 20‑some doors around to the scaffolding on the port side of Ocelot, so that they could work on getting the first coat of gloss varnish on the 8 big people doors. We never realized just how many doors and lockers we have until we saw all the teak laid out under Ocelot. Pla and Baw spent 2 hours on final preparations for the first gloss varnishing. This involved last minute fine sanding, checking that all was ready, then wiping with a tack cloth and alcohol. By 4:30 all 8 of the big doors had their first, glossy varnish coat on one side.
A pass though the boat revealed a few more bits and pieces that needed varnishing, so they were handed down. The Indonesians and Lek worked on them behind Ocelot all day in a chatty group, getting them ready for Baw to varnish.
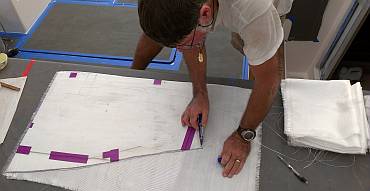 Using a template to cut out 200g glass cloth for the rudder |
Sue scrubbed more of the salon cabin top trying to keep ahead of the dust and grime accumulation that just seems to be in the air. We had hoped to start spraying gelcoat on the cabin top early this week but it won't happen. The men are too tucked into the varnish project and it would be silly to stop it now, with things half done.
Jon spent some time with Neil, the boat builder who is helping reshape our rudders. Neil grabbed a few more rudder dimension and said he'd be back in the next couple days. Cool! Inspired, Jon found some old future board (plastic cardboard) and made himself a template of the current rudder shape. Then he laid out the light fiberglass roll in the cockpit and cut out the 4 pieces to be used for the first covering of the metal rudders. More durable biaxial glass will be used as the final outer skin, once the rudders are correctly shaped.
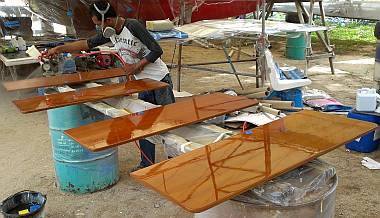 Baw sprayed 2 coats of satin varnish on the cabinet door fronts |
Wednesday, August 21:
Moving ahead lickety‑split, with the week half over already! And so many things going on...
The big news on the varnishing front is that Baw, with Pla as his assistant, finished spraying 2 coats of satin Epifanes varnish on the front‑sides all of our internal locker doors! To put the final coats on the exterior of the doors they masked the inner side with blue tape and plastic so there would be no overspray. Then they checked the whole surface to be sure it was well sanded, wiped with a tack cloth to get off any dust, wiped with alcohol, then fired up the compressor. It took just 6 minutes to spray 2 coats on 4 doors, so less than an hour for all the locker doors! We're sure there will be some "repairs" to make, as sometimes a bug flew in, and once a bit of masking plastic brushed against the new varnish. These things are to be expected.
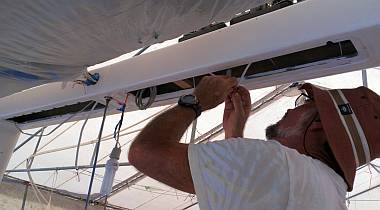 Working on targa-bar wiring, with bagged up solar panels above |
Meanwhile, the Indonesians and Lek sat on old gelcoat drums under Ocelot's stern, preparing the many varnish "extras." These are things like the removable cover on the steps to the bunks, the odd locker doors and drop‑down doors in the salon, drawers and drawer fronts. Basically, the last of the loose varnish jobs. Some have already had a coat of gloss varnish, and others have yet to get coated. It's a good thing Baw can keep track of all of this, because we're not sure we can! One interesting thing about the satin finish is that it removes the characteristic "deep" varnish look you get with a gloss finish, the look that says "Hey, I have a lot of varnish on me! Shine Shine!" The satin finish, even though it's over several coats of varnish, ends up looking like very fine wood furniture, not the shiny bright of gloss varnish. But it's very elegant and lovely, and it hides some of the flaws that gloss varnish accentuates.
More sanding of the interior trim in the salon was done by Yando and Lek later in the day. Obviously they're getting ready for yet another coat of AwlBrite.
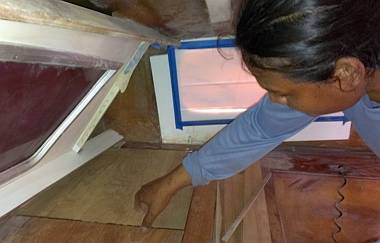 Checking his teak panel fit in the port forward corner of the salon |
Houa moved seamlessly from all his teak cockpit work to some smaller carpentry jobs in the salon. Having made a template of the water damaged area on the port shelf of the salon yesterday, he took his newly planed strips of 4mm teak and butted them together, then used superglue to hold them in place. He brushed epoxy resin on the bottom as a sealant and water proofing, and from the way he cut the strips, the epoxy worked its way down the butted sides to hold the teak strips together more permanently. He also played with the positioning of a long teak strip that goes under the headliner on port side. We didn't even know it had been taken off, or that anything was wrong with it, but apparently Golf had asked Houa to remove it last year. So now it has to be replaced. Houa also measured the area near the companionway drawers that needs a bit more TLC and teak before it's declared finished.
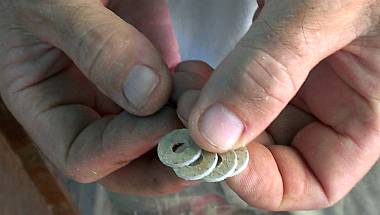 Simple non-conductive washers, drilled out of a fiberglass sheet |
Sue was all over the place today. She ran several scooter errands for things like more varnish, specialty tape, white spirits, and lunch. She recovered 14 pins from our old rod rigging. She cleaned out our wooden lock box where she has kept all the Nyalic project and miscellaneous bits and pieces of disassembled hardware. Because the guys will be working in and varnishing the salon, we have to move as much stuff out of there as possible, so maybe now a lot of Jon's electric tools can go in the lock box. We'll be putting other tool boxes in the cockpit aft seat locker which doesn't need to have a teak hatch taken off to access it. She took numerous trips to the store room to sort things, look for hardware, and take things there that we don't need or want to have underfoot on the boat right now.
Jon didn't get any more work done on the rudders, as Neil didn't come by with his sketches or figures on how to reshape them. So Jon concentrated on getting the wiring for the targa bar lights all set up. We still don't have good housings for these LED lights. The old ones have corroded away into disrespectability.
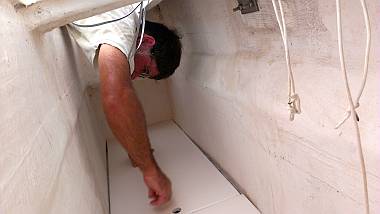 Jon putting in the floor to the rope/dive locker, above steering gear |
Another looming project has been to re‑attach the solar panels to the targa bar. We were hoping to buy plastic shoulder washers to insulate the stainless steel screws from the aluminum solar panel frames, but there don't seem to be any for sale in Phuket. We tried to get them machined at our favorite little local machine shop, but the quoted price came in way too high, at about $5 per washer (in the US, a bag of 50 might cost $5). So Jon went out and bought the right size hole saw (for $5) and cut himself a bunch of fiberglass washers. They don't have shoulders, but that's what TefGel and Duralac are for! Mounting the solar panels is a bit of an involved job so it's been put off until some open time, hopefully tomorrow.
Thursday, August 22:
Another hot and sunny day, with a new twist on the varnishing project.
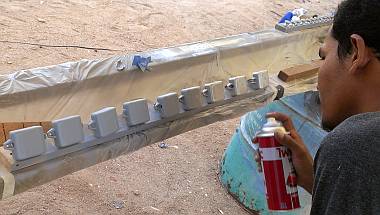 Baw's paint factory for the latches (left) & buttons (upper right) |
Baw's first question in the morning was "What you want, Madam, with finished varnish?" gesturing to the 20‑odd beautifully varnished locker doors. "Put in the boat" we answered. "Wrap in paper?" he asked. "No, mount in cabins," we said, miming turning a screw driver up against a vertical wall. "Ah, no put in store room?" "No, put on boat!"
At which point Baw studied the corroded latch, button and ring embedded in the teak, shook his head and said, "Not beautiful." We agreed. Hey, it's 18‑year‑old metal‑painted plastic. If we pull lots of strings in the US, we can get those latches for $15 each, and we have a few spares, but Ocelot has over 30 of them. "Can make beautiful," Baw said. "Spray paint. Easy." He gestured holding down the top of an aerosol can of paint. "Okay," we said. "We try."
So Baw rode off on his scooter and returned in 10 minutes with a can of silver automotive spray paint, which he assured us was "Very strong. Very good. Use on motorcycle." So he masked off the embedded plastic ring with blue tape, finger sanded it with 220 grit, then wiped it with alcohol (acetone might have crept under the tape and wrecked the new varnish job!) Masking the whole door with cleverly cut vinyl he sprayed the little ring. We agreed it look a bit thin. "Primer", he suggested, so he rode out again and retuned with a similar spray can. The ensuing results looked wonderful! And it was quick and cheap! And so the day went, with 5 of our guys doing detailed sanding on the old plastic locker button, rings, and latch mechanisms that hide inside the doors.
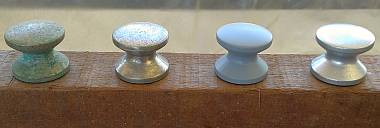 Latch buttons: corroded, sanded, primed, painted silver |
Houa was with us only in the morning, and he got more fitting done on the salon teak repair project and set Lek up to put a layer of epoxy resin on the new wood. This shelf just aft of the port lights in the salon is vulnerable to rain water, and if we're not careful, an influx of salt water if we forget to close the port‑light after raising the anchor. So the epoxy will help seal and protect the wood. Varnish will be applied over the epoxy.
While the little locks job was happening, Lek moved into Houa's space (out of the dust and wind) and prepared the big cabin and head doors for another layer of gloss varnish. By day's end we had gloss on both sides of each of the 8 big doors.
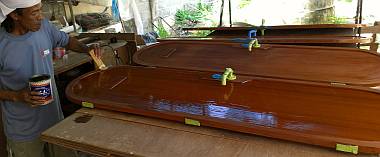 Lek brushing gloss varnish on the cabin doors in Houa's shop |
Jon worked alone in the cockpit with his favorite work music playing through the newly mounted speakers. He started off by cleaning out the locker under the aft cockpit seat, where we normally carry our dive gear and spare ropes. He greased some steering gears down there and then put in the new shelves that form the floor of the rope/dive gear locker, just above the steering gear. The seats themselves open to give access to those lockers. They haven't received their final gelcoat polish and they don't have their gaskets yet, but Jon was going to be working above them so he wanted them in place, so he didn't fall down into the locker. So he taped some temporary gaskets in place and plonked the seats down so he could walk on them.
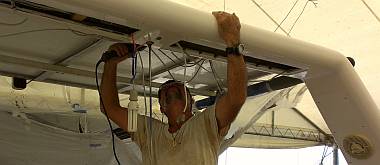 Jon drilling & bolting the solar panels to the back of the targa-bar |
Jon spent much of the afternoon up on the scaffolding under the targa‑bar, getting the solar panels re‑mounted to the targa‑bar. Position the panels, drill 8 new mounting holes through the frames and into the targa‑bar, move the panels back, clean the targa‑bar and the aluminum panel frames with acetone, shoot a bunch of silicone against the targa‑bar (we want the joint to be rain‑proof), pull the panels back into position, sploob a bit of Duralac (anticorrosive) on the aluminum around the holes, and run in the bolts with their spiffy new non‑conductive fiberglass washers. A bit more silicone along the bottom edge of the panels (more for looks) and another bead of silicone along the top of the targa‑bar to keep water from dripping down. Then (finally!) the rusty drums holding up the scaffolding board could be taken below and the cockpit cleaned of their bits of rust. Yay! One more milestone in the re‑assembly of Ocelot!
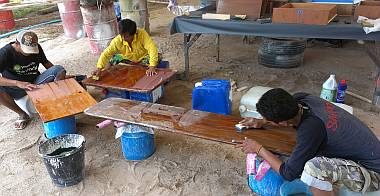 As with most surfacing operations, preparation is the key |
Sue's morning project was to estimate how much gelcoat we'll need to spray between the panels of nonskid. She had a long chat with Mike to be sure she had the numbers right on how much gelcoat covers how much area, at what thickness. Ballpark figures: 1.5kg of gelcoat (with the big spray gun that was 2 full pots) covered 1 square meter with enough gelcoat to sand it down to a finished 1mm. That is, it theoretically sprays on about 1.5mm of gelcoat and the men theoretically sand it down by 0.4‑0.5mm, thus leaving us a nice 1mm coating. Lots of guestimations here. We finally decided that if we have a pretty accurate idea of the square meters of the cabin top (the first place we'll put on the final coast), and if we record how much we use, and take measurements of the wet gelcoat with a thickness gauge, then we'll be able to know how we're doing, and if we need to order another drum or not. A 20 liter drum of our color specific ISO‑2500 gelcoat costs about $300, so we don't want to over‑buy. We currently have almost 40 liters of gelcoat left. Still to do, measure and compute the area of the rest of the deck!
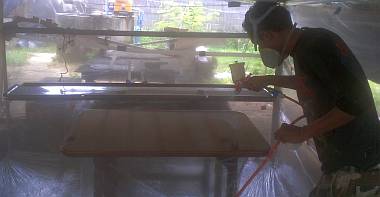 Baw in his tent spraying more AwlBrite on the table pieces |
Friday, August 23:
Yikes! Almost end of the week, and it felt like a long, slow day.
Houa was out sick, and that meant nothing happened in the woodworking arena. Although Lek followed through on our request to epoxy‑coat the teak bits for the repairs in the salon. He also brushed epoxy on the removable steps that go down the side companionways. We'll be top coating these all with polyurethane for UV resistance.
Baw and Pla worked together most of the day. They did a final sand and masking on the cockpit and salon table undersides. Fired up the compressor, mixed up the last of the AwlBrite 3 part and got another good coat sprayed on. Apparently this stuff is polishable, so the tiny bits of dust which seem to be inevitable in Coconuts yard can be polished out, for a really bright, strong finish. Can't wait to see it!
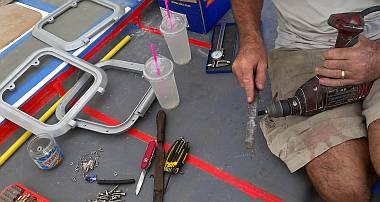 Jon using his drill as a lathe to machine down hard rubber tubing |
Neil never showed up with the new rudder profiles so Jon turned to other things. He chiseled the tops off the Sika calking on the aft deck, thereby making it ready to cover until its final sanding. After lunch he took the scooter into town to several hardware stores. Amazingly he came back 3 for 3! He found an exact replacement small switch for our LED drop light and a new push button lock for the cabinet doors. We may not need very many more but it's sure nice to know we can get them here!
The coup of the trip was finding some dense rubber hose that we can probably use in the hinges of our 10 deck hatches. These hatches (and the 2 forward port‑lights in the salon) use a cylinder of hard rubber, about 1" (25mm) long and 3/8" (9mm) in diameter, as the friction device, so the hatch stays where you open it to. A small bolt runs through the rubber cylinder and tightening the bolt compresses the rubber so you can set how easily the hatch moves. Goiot (France) wants something completely ridiculous like $80/hatch for these. Jon found some reinforced rubber tubing that he can trim down to the correct size by putting a bolt through a piece of the tubing, mounting the bolt in his drill, and then sanding the rubber down as the drill spins it. For about $10 and some time he should be able to create these 24 expensive hinge posts (as well as a huge mess of shredded rubber).
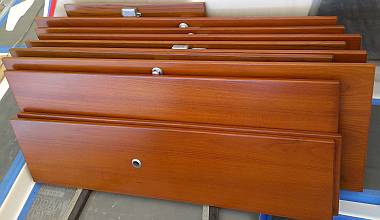 Beautifully varnished cabinet doors - Now, where do they go? |
Heru got the last of the vinyl put down over the aft deck, then settled in below Ocelot with Chambron and Yando. Together they cleaned up the last of the cabinet door latches and buttons, getting them ready for a silver spray. Then they helped Pla sand the head doors which are getting ready for coat number 3 of gloss varnish.
Sue helped carry the finished cabinet hatches up to the cockpit and began trying to figure out where they all go. Because they were sanded and varnished on both sides, there was no way to keep a notation of what door goes where. But fitting and replacing them will have to wait a bit. Each locker door needs its blue tape and plastic masking removed before the doors can be fitted. And unfortunately there a bit of touch‑up varnish still needed around the trim on some of the lockers. So this needs to be addressed before the doors are hung or they will semi‑hide the poor varnish, and we'd probably never get back to it! As usual, she was the Ocelot Gopher, scootering off to errands here and there. How did we ever manage without a scooter?
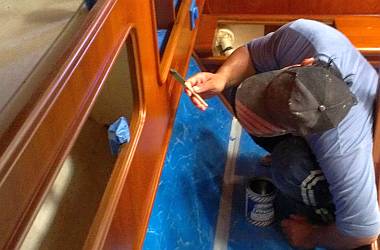 Pla touching up the satin varnish in the port aft cabin |
Saturday, August 24:
A long‑awaited end to the week. These 6‑day work weeks are killers.
We were sorry to hear that Houa was still out sick, so nothing new happened on the teak work in the boat. Under Ocelot, though, the Indonesians sanded lots more doors and drawers preparing them for yet another coat of varnish. Lek was right behind them, brushing on either a second or third coat of gloss varnish.
Inside, Pla sanded, wiped and then hand varnished the rims of the locker doors in the cabins. Once this dries (and is approved by us and Baw) we can re‑hang the locker doors. That will be exciting!
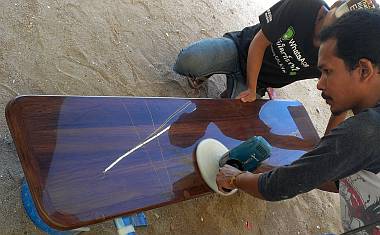 Polishing the cockpit table - reflection is a neighbor's mast |
Baw had a big surprise for us. He had talked about being able to polish the AwlBrite finish on the tables, but today we got to see it in action. He pulled out the polisher, our 2 different polishing compounds, and set to work on the cockpit table which has 3 layers of epoxy, topped with 4 layers of AwlBrite clear polyurethane. With Heru holding the tables still, Baw ran the polished over the clear finish. Wow! What a shine! The glossy surface looks ¼" (6mm) thick! "Same‑same gelcoat," says Baw.
Jon had a mini‑coup on the Goiot hatch project. The thick reinforced rubber hose he bought in Phuket town works well to create the friction part of the hinge that holds the hatch halves together. He experimented with different cutting and sizing techniques and settled on a system: He cut the hose into 1" (25mm) sections, drilled out the interiors slightly to fit the bolts that will go through them, and mounted a section on a 2" (5cm) long bolt, with a nut and washer at each end to hold the hose piece securely. He mounted the bolt (and hose) in the chuck of his drill, and with the drill spinning, he used a sanding disk on a grinder to shave down the outer diameter of the hose to the exact OD needed for it to fit into the hatch hinge. Today he made about 10 of the necessary 24, so there still more to do, but we think we found a way to beat the exorbitant Goiot parts prices.
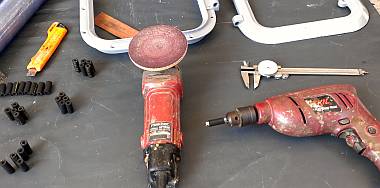 Jon's tools for making the friction hinges for the deck hatches |
Where was Sue? Zooming around on the scooter, of course. Seemed like a million errands to run, and all cut short by wanting to get off to Ao Po for the weekend before rush hour, or at least leaving in time to arrive before sunset. She made it, barely. It is glorious to ride those country roads in northern Phuket, between hillsides of rubber plantations, occasional small villages, then sweep around a hillside and finally arrive at our friends' apartment above the golden water of Phang Nga Bay at sunset.
Just yesterday we were invited to a Buddhist House Warming party at the new home of Manoon, one of the brothers who owns the Coconuts boatyard. It was an honor to be invited, but the party wasn't to start until 6pm, by which time Sue needed to be almost one hour north. So Jon offered to make an appearance (apparently one loses face if you don't show) and he even had time to find a nice house gift.
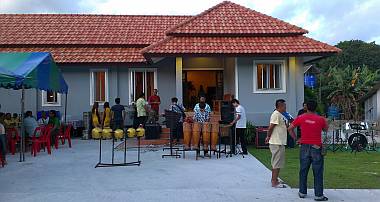 The band setting up in front of Manoon's new house |
The party was set up for over 100 guests, with live band: some very interesting drums, a base guitar with a dragon's head at the end, and a long sweeping wooden xylophone‑like instrument. Lots and lots of food, of course - a spitted pig, about 20 barbequed chickens, a long buffet table, and perhaps 10 kegs of beer. Apparently the party went on until after midnight.
Sunday, August 25:
A mental health day out of the yard, out on the water, up in beautiful Phang Nga Bay, to the east
of Phuket!
 The incredibly convoluted limestone of Koh Phanak island |
We started our Sunday morning with a now‑traditional champagne brunch with Bruce and Alene at their apartment overlooking the blue waters of Phang Nga Bay. By noon we had accepted an invitation to spend the afternoon aboard an American cruising boat, Infini, and boy were we in for a treat. Having just come off a 4‑month refit themselves, Michael and Sue on Infini were ready to test some systems, like raising the mainsail for the first time in months and months.
So the 6 of us, all sailing‑starved cruisers, set sail heading north up the bay towards towering Koh Phanak. The breeze held steady at 12‑15 knots, and Infini picked up speed and we danced over the flat water at 6‑7 knots. We anchored off the east side of the island and a few brave souls dove in, only to find the current almost too strong to swim against! We circumnavigated Koh Phanak on the way home so we could show them the entrance to the 100m long cave ("hong") on the east side. The wind was out of the SW but Infini was able to sail both ways. Good friends, laughter, sailing, sun, fresh air, the silence of nature. What a great day!
Thai Refit:
Ocelot Pages:
Top Level: Home | Destinations | Cruising Info | Underwater | Boat Guests | Ocelot | Sue | Jon | Amanda | Chris | Site Map | Make a Comment
|
If our information is useful, you can help by making a donation |
Copyright © 2000‑ Contact: Jon and Sue Hacking -- HackingFamily.com, svOcelot.com. All rights reserved.